 Checks can seem confusing at first glance, but they’re pretty much straight forward after you’ve learned all the different parts of a check.
In this post you’ll learn what each part of the check means.
When you learn each component and put them all together, you’ll know how to fill out a check, and if you need help with learning how to write down the dollars and cents on a check, be sure to check out our post where we explain how you’ll write down each number and give different examples.
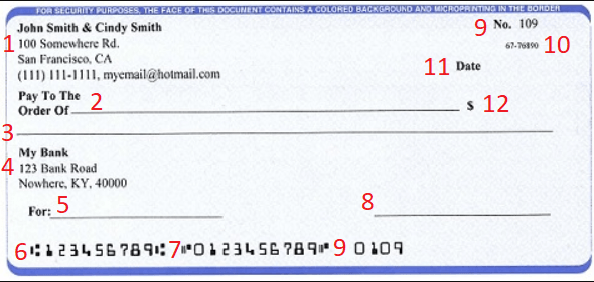
Parts of Check & What It Means

- Personal Information: Information about you/the owner
- Payee Line: Who the check is payable to
- Amount of your check: Written out amount in words
- Bank’s Contact Info: Information where your bank can be contacted
- Memo Line: Space for an unofficial note
- Banks Routing Number
- Your Account Number
- Signature Line
- Check Number: Found in two places on the check
- Your Banks fraction number
- Date Line
- Dollar Box: Amount written in numerical format
1. Personal Information
- The upper left corner typically shows personal information about you, such as your full name, address, phone number, and your email. This part is considered very important since this is how people who receive these checks will be able to contact you. Some merchants won’t accept your check if you don’t have a personalized check. If you’ve just joined a bank you may receive some blank checks before your personalized ones are made where there top left corner is blank for you to fill in. If you’re worried about your privacy, you can limit the amount of information given in the personal information section.
2. Payee Line
- This is the area where you will write out the full information of whoever is to receive this check. Include a name or the organization that you are writing it to. Only the payee is allowed to deposit the check, so be sure you write down the correct information when filling in this line. If you don’t wish to write out the check to anyone, you may fill out the line as “cash.” However by doing so you risk the chance of any random person taking the check and cashing it in.
3. Amount of your check
- In this section, you will write out the amount of dollars in word format followed by the cents in fraction form. For example if you are paying a person/organization $33.52, you will write out Thirty Three Dollars 52/100. Writing out the amount in words helps avoid confusion and the chance of fraud as someone may try to change the amount you’ve written down in the numerical dollar box. As a matter of fact the written form of amount paid is the official amount. If there is any confusion between the Dollar Box and the Amount of your check, it will automatically be decided by the amount written down in word form.
4. Bank’s Contact Information
- This section shows the name of the bank you use and their phone number. Additionally they may sometimes include the address of the bank you used for making your checks. If you receive a check from someone, this section will show what bank they use and where the money should come from. If you want to cash the check, you should be able to use their bank to do so. However, sometimes they may add a fee for not being a customer with their bank or might just refuse to cash the check.
5. Memo Line
- The memo line is used for any unofficial information written on a check such as who the money was for, or what account you used to pay for it. Whenever you write a check, you’ll have a copy check, so if you’re ever going through old written checks, the memo line is useful for keeping track of your transactions. You don’t have to use the memo line, but most people who do use it generally write down who the money was paid to and/or what account they used. If you do plan on using the memo line, be sure to not block any other section of the check, such as your account/routing number.
6. Banks Routing Number
- The routing number found at the bottom of the check serves as an address that will be used for other banks to contact your bank. They use this number to contact and transfer funds. They are always written in a particular font using magnetic ink so that computers can easily register the numbers.
7. Account Number
- Your account number is also located at the bottom of the check next to your routing number. It is also written in the same peculiar font and using the same ink as the routing number. A general rule of thumb is that you’ll find 3 numbers at the bottom of a check all in this order; Routing number, account number, then check number. This isn’t always the case as some checks may be formatted differently. A quick and easy way to find the account number on a check is that it has a ? sign before and after it. For example, as seen on the example check above, ?0123456789?.
8. Signature Line
- This is the line that you’ll sign your check. Be sure to not sign the line until you’ve finished and reviewed your check. If you’re to sign a blank check, anyone who gets a hold of it can write down any desired amount they want and cash in the check. After you’ve reviewed and signed your check, whoever is to receive the check should sign the back of it to endorse the check. Your bank will have you sign a signature card when you set up an account to ensure that any check turned in with your name and signature matches to prevent anyone from writing and forging your signature.
9. Check Number
- This is just used to keep track of the number of checks written. This number usually appears in two places on the check, the top right corner and the bottom right corner. However, checks can be formatted differently, so if you can’t find the check number, you can try looking for the shortest printed number on the check. That is usually the check number.
10. Bank Fraction Number
- Your bank fraction number/American Bankers Association number is generally located in the top right corner. This number is formatted as 12-34567/8901. This number represents the bank, its location, and the federal reserve branch which services the bank.
11. Date Line
- This is the line where you’ll simply write down the date that you wrote the check.
12. Dollar Box
- This is the box/space where you will write down the amount paid in numerical format. This box is also known as the courtesy box, because this box does not determine the amount given to whoever is receiving, it’s just there for convenience. If the dollar box and the written amount are mismatched, the written amount will always take precedence over the dollar box. It’s very simple to fill this box. If the amount paid is Thirteen Dollars and 80/100, you’ll just fill in the box as 13.80. The $ sign is already in place so you just need to add the numbers.

Most and Least Important Areas
All of the information found on a check is important, so make sure when you hand it off to the bank worker, retailer, or scanner that it has all the details they need. it’s okay if you want to cross out your address and provide an updated address if you have moved recently.
The least important area of a check, to the bank, is the memo area. Most of the time they will skim over this section because it is primarily for the check writer’s notes.
 |
 |
Bottom Line
After reading this post about the components of a check, we hope you gained valuable information. Applying the information you’ve gained from this post, you should be able to write out the perfect check with no problems. If you’re still unsure of some parts of the check, be sure to check out our other posts on HMB in the Bank Guide category.
If you’re interested in researching new banks, go through our posts about Best Bank Bonuses, Best Savings Account Rates, and Best Credit Card Bonuses. Be sure to soak in all this information when choosing the right bank for you!


